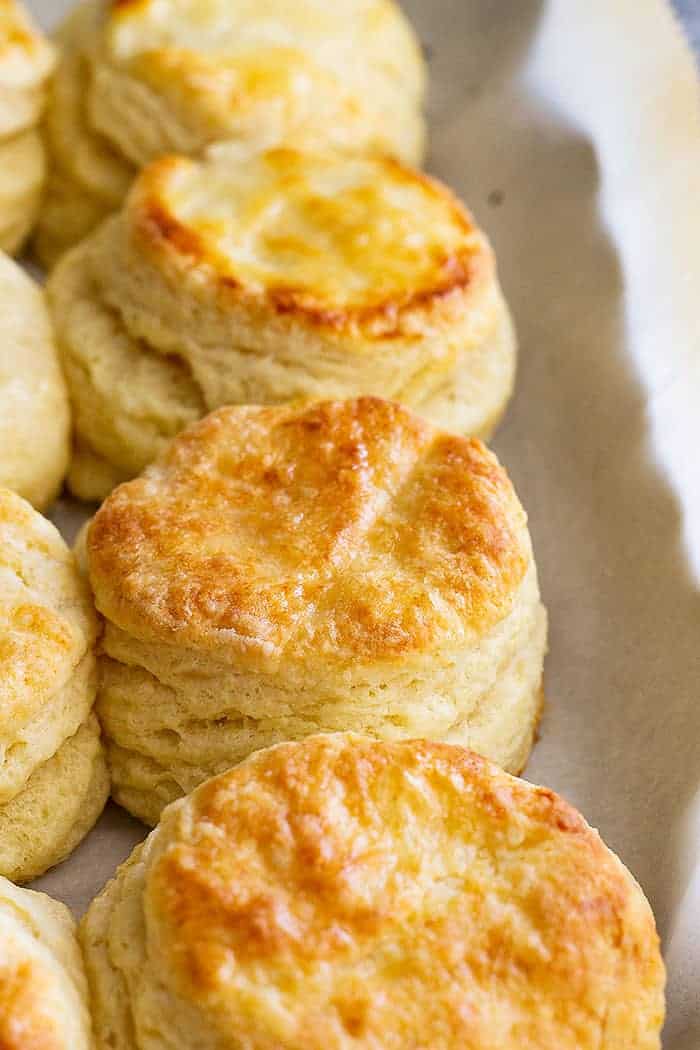
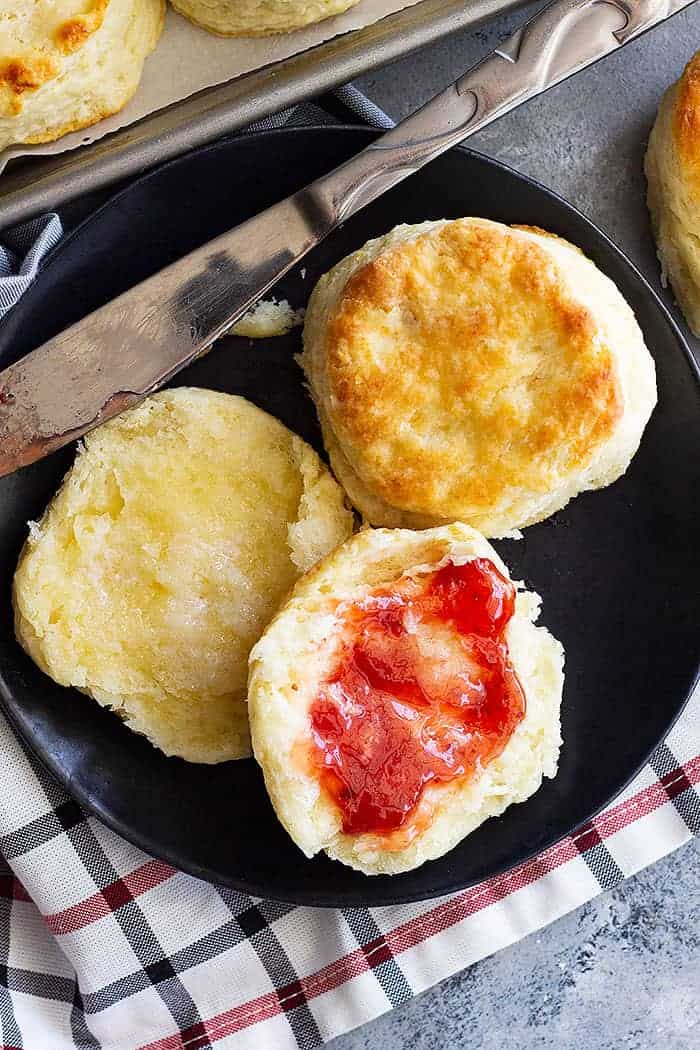
How To Make Flaky Buttermilk Biscuits + VIDEO
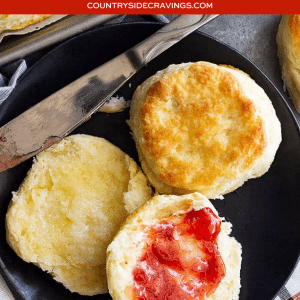
This guide will teach you how to make Flaky Buttermilk Biscuits with only 15 minutes of prep time. With a few tips and tricks, anyone can make tall, fluffy biscuits that are golden on the outside, soft on the inside, and full of buttery layers! Homemade biscuits really are easy to make and simply the best comfort food.
Simple Biscuit Recipe
I have been making homemade biscuits since I was a very young girl. I have used many different recipes, only to come back to the one in the Betty Crocker Cookbook that I have only slightly altered. It gives me deliciously consistent results for flaky and fluffy buttermilk biscuits and flavor!
I do understand the need for store-bought refrigerated biscuits – let’s face it, we don’t always have time for homemade flaky buttermilk biscuits. But if you do have a little extra time, I urge you to try your hands at this simple biscuit recipe from scratch!
They really are easy to make, even for a beginner, and store-bought just can’t compete with the tall, buttery layers in these fluffy buttermilk biscuits.
If you love biscuits, you should give these other great homemade bread recipes a try, too: Buttermilk Cornbread, Easy Banana Bread, and Beer Bread.
Why you’ll love this biscuit recipe:
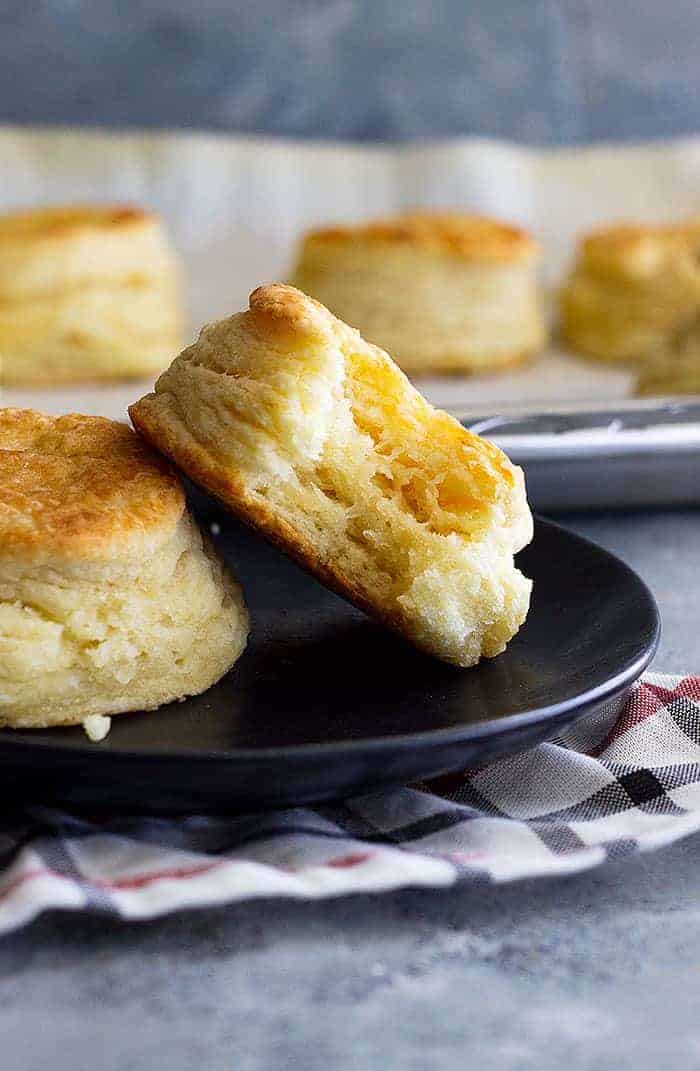
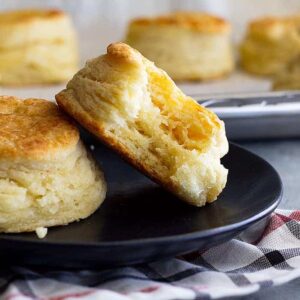
- These flaky layered biscuits are what dreams are made of: tall and fluffy with flaky layers on the inside but perfectly golden, fluffy, and crispy on the outside.
- They are easy to make and only take 15 minutes of prep time.
- You can make the dough and freeze it ahead so that freshly baked flaky buttermilk biscuits are at your fingertips anytime the craving arises!
- Only 7 simple ingredients, and you probably have most of them on hand!
Ingredients for flaky biscuits:
Flour: I almost always use regular all-purpose flour, but I have also made these biscuits using 1/2 white whole wheat flour and 1/2 all-purpose. I use a little more buttermilk when doing this. For the right texture, remember to measure your flour by spooning it into the cup and leveling it with a butterknife instead of packing it in.
Sugar: It just adds a touch of sweetness to balance the buttermilk and salt.
Baking powder: This is a rising agent that will help create tall, fluffy biscuits. It can’t be substituted with extra baking soda.
Baking soda: This is also a rising agent that works with the baking powder. Make sure your baking powder is not expired for the best results.
Salt: If you use salted butter, just omit the salt.
Butter: I use unsalted butter because I like to control the salt. But if you only have salted, just omit the salt in this recipe. The most important tip for biscuits is to have cold butter. I like to put mine in the freezer for at least 2 hours.
Buttermilk: Like butter, this ingredient also must be very cold. Buttermilk adds flavor to an otherwise bland biscuit, so don’t substitute it with regular milk. If you don’t have buttermilk, you can make some by pouring 1 tablespoon of white vinegar or lemon juice into a liquid measuring cup, then filling it with milk to the 1 cup line. Let stand for 5-10 minutes before using.
How to make flaky buttermilk biscuits:
PREHEAT THE OVEN: Preheat oven to 450°F (232 degrees C). Line a baking sheet with parchment paper or lightly grease, then set aside. OR use a cast iron skillet lightly greased.
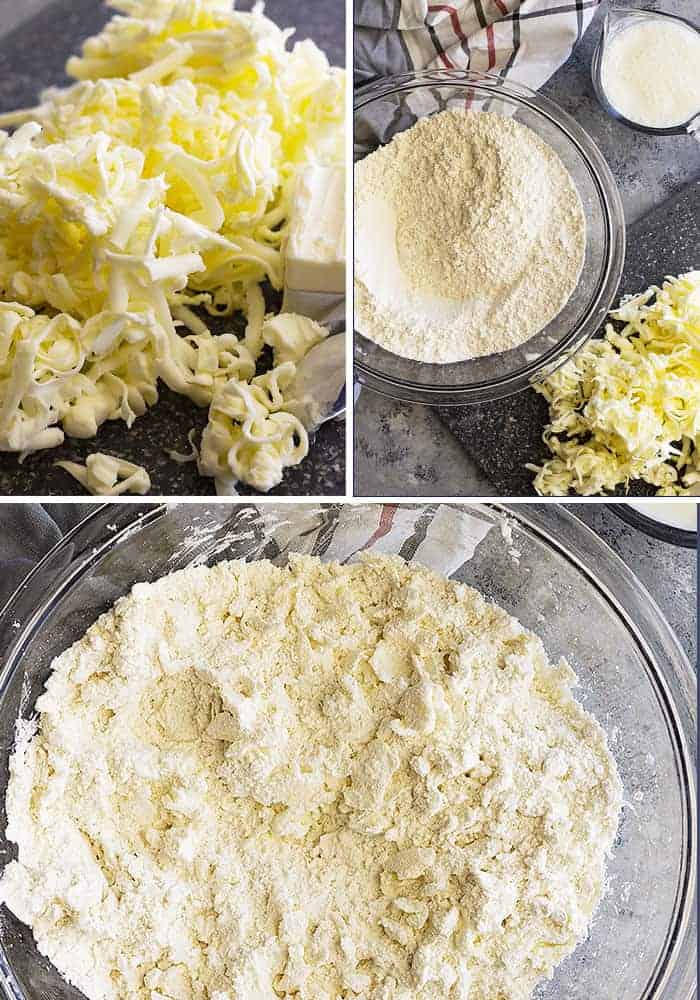
COMBINE DRY INGREDIENTS: In a large bowl, combine the flour, sugar, baking powder, baking soda, and salt.
ADD COLD BUTTER: Using a cheese grater, grate the very cold butter into the bowl of flour. Gently mix in the butter.
Let me take a second to pause since this part is very important. COLD butter is a must! When baked at a high temperature, those little pieces of butter in the biscuits will melt and release steam — this creates pockets, aka layers! It also keeps the biscuits tender on the inside and crispy on the outside.
I like to use a cheese grater to grate my frozen butter, then I just stir it into the flour mixture. It’s a great way to get nicely sized pieces of butter all throughout the dough.
If you don’t have a grater, don’t freeze the butter. Instead, cut the cold (refrigerated) butter into small pieces with a knife, then using a pastry blender or two knives “cut” the butter into the flour mixture until it resembles crumbs the size of peas.
**Pictured above is what the butter and flour should look like**
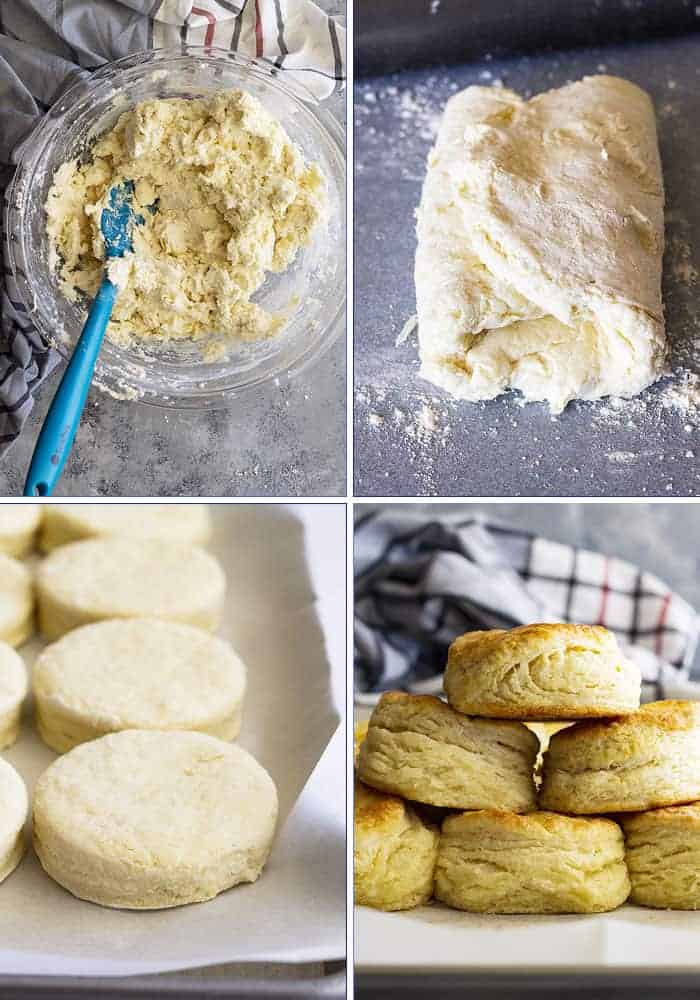
ADD BUTTERMILK AND KNEAD: Stir in the cold buttermilk just until the dough starts to come together. It will look very rough and shaggy. Place dough onto a work surface and gently knead a few times to finish bringing the dough together.
I stir in the buttermilk just until things start to come together (pictured above in the bowl). Then, I dump this onto a work surface and gently knead about 5-10 times, 10 being the max.
Another pause is due as this is also very important… don’t overwork the dough. This can take some practice so don’t give up if your first few batches of biscuits don’t turn out as you had hoped. Just keep trying and you will get it, promise!!
ROLL THE DOUGH: Roll dough into a rectangle and fold it into thirds (pictured above). Roll into a rectangle again and fold into thirds. Lastly, roll into a rectangle or square that is about 1/2″ thick.
CUT THE BISCUITS: Use a biscuit cutter for circles or a sharp knife for square biscuits. Dip the cutter or knife into flour and press straight down into the dough. Don’t twist the cutter or saw with the knife, because that will seal the edges of the biscuit and they WILL NOT rise as tall or hold their shape. Also, don’t use a glass to cut them because it will seal the edges as well.
RE-ROLL AND CUT MORE BISCUITS: The topic of re-rolling can be a bit heated. Some say not to re-roll at all, but I just can’t stand to waste, so I re-roll until I have used all the dough. Just do so with a light touch and know that every time you re-roll, the biscuits will get a little tougher.
On the final round, I just sort of roll up the remaining dough into one larger biscuit. *See video*
BAKE THE BISCUITS: Place biscuits on the prepared pan — let the sides touch for softer sides, or space biscuits apart for crisper sides. Bake for 10-15 minutes or until golden brown.
Tips for making fluffy buttermilk biscuits:
- Use a relatively sharp biscuit cutter or knife to make a clean cut that doesn’t seal the edges of the biscuits.
- Use a bench scraper for easy clean up on the work surface and utensils. It is MUCH easier than cleaning everything with a wet cloth. This is a must, in my opinion.
- For crispier sides, space the biscuits apart on the baking sheet. For softer sides and a taller rise, place the biscuits close enough to touch on the baking sheet.
- As mentioned earlier, use COLD butter and buttermilk, and don’t overwork the dough. Follow these two tips and you will be golden.
FAQs:
You can freeze flaky layered biscuits for up to 3 months if stored in an airtight container. But even better, you can freeze raw biscuits and bake them whenever you want!
• To freeze them raw, follow the simple biscuit recipe and prepare the dough, then cut the biscuits as directed. Place them on a parchment-lined baking sheet and freeze until solid (about 2-4 hours). Transfer to a zipper bag and freeze for up to 3 months.
• To bake from frozen, place the frozen biscuits on a parchment-lined baking sheet or greased cast iron skillet. Bake in preheated oven for 18-20 minutes or until golden brown.
Store baked fluffy buttermilk biscuits in an airtight container for up to 5 days or freeze them for up to 3 months.
If you twisted the biscuit cutter at the bottom, sawed with a knife, or used glass to cut the dough, it probably sealed the edges of the biscuits. Sealed edges = no rising. It also may be a problem with your baking powder or soda. Make sure both are fresh and haven’t expired.
Looking for more great recipes?
- Garlic Cheddar Biscuits
- Easy Buttermilk Cornbread
- Chicken Pot Pie with Biscuit Topping
- Slow Cooker Mashed Potatoes
- Easy Slow Cooker Pot Roast
HUNGRY FOR MORE? Subscribe to my newsletter and follow along on Pinterest, Facebook, and Instagram for all my latest updates!
How To Make Flaky Buttermilk Biscuits
Ingredients
- 3 cups (345g) all purpose flour
- 1½ tablespoons sugar
- 3 teaspoons baking powder
- ½ teaspoon baking soda
- 1 teaspoon salt
- ¾ cup (169g) COLD butter
- 1 cup (240ml) COLD buttermilk
Instructions
- Preheat oven to 450°F (232 degrees C). Line a baking sheet with parchment paper or lightly grease, then set aside. OR use a cast iron skillet lightly greased.
- In a large bowl combine the flour, sugar, baking powder, baking soda, and salt. Using a cheese grater grate the very cold butter (I like to keep mine in the freezer) into the bowl of flour. Gently mix in the butter. Stir in the buttermilk just until the dough starts to come together. It will look very rough and shaggy.
- Place dough onto work surface and gently knead dough 5-10 times to finish bringing the dough together. Roll into a rectangle then fold dough into thirds. Repeat then roll into a rectangle or square that is 1/2" thick.
- Cut with a 2 1/2″ or 2 3/4″ biscuit cutter by dipping it into flour and pushing straight down. Do not twist the cutter. Cut the biscuits as close together as possible. Place biscuits on prepared pan with sides touching for softer sides or space apart for crisper sides. Re-roll any scraps until you have 12 biscuits.
- Bake for 10-15 minutes or until golden brown.
Video
Notes
- Be sure to refer to the post and video for helpful tips on making biscuits.
- Store baked biscuits in an airtight container for up to 5 days. Or freeze them for up to 3 months.
- To freeze biscuit dough: prepare biscuits and cut with biscuit cutter as directed. Place raw biscuits on a parchment lined baking sheet and freeze until solid (about 2-4 hours). Transfer to a ziploc bag and freeze for up to 3 months. To use: Place frozen biscuits on a parchment lined baking sheet or greased cast iron skillet and bake in preheated oven for 18-20 minutes or until golden brown.
- Nutrition Facts: Since different brands of ingredients have different nutritional information, the information shown is just an estimate.


First time making biscuits. Great recipe, turned out great and delicious.
Thank you so much!! I am so glad you liked the biscuits!
I love the recipe but where is the video?
The video is right below where I explain the ingredients in the post. Hope that helps!
I can see two places where it mentions a video but neither works when I click on them.
It states “On the final round, I just sort of roll up the remaining dough into one larger biscuit. *See video*”
The other is in the recipe, after #5.
Bake for 10-15 minutes or until golden brown.
Recipe Video
I would love to be able to watch your video!
See if this works. I took it out of the post and embedded it into the recipe card. It should be right above the recipe notes section in the recipe card.
These were very well received as part of our Easter dinner. One question, was it correct to assume unsalted butter?
So glad you liked them!! And yes that is correct. All of my recipes use unslated butter unless otherwise stated. Thanks for asking and so glad you enjoyed them!
Best layered biscuits I have ever made. I had a go to IHOP biscuit recipe I’ve been using for years but this is now it.
WOW! Thank you so much for your wonderful comment!!
I love all the great tips and tricks you gave here! I will definitely have to try the “folding” technique the next time I make biscuits!
It’s a game changer!! Let me know how you like them!
I’ve been looking for that “go-to” biscuit recipe and this looks like it might be the one. Thanks for all the tips and tricks!
You’re very welcome!! Let me know how you like them!!
I’ve never made homemade biscuits. GASP! Thanks for all the tips and tricks. Trying these!
They aren’t as hard as people think and they taste so much better!! Let me know how you like them!
Oh my gosh these were so flaky! I can’t believe I made them and they turned out so good, your tips and tricks really helped!
Thank you, Lois!! I am so glad you liked them and my post helped!!
Flaky buttermilk biscuits are the best “comfort” side to go with any dinner – they go well with everything!
I agree!! Thanks Danielle!!
Hi Malinda!
Fresh buttermilk biscuits are the best!
Going to give your recipe a try.
They’ll make a wonderful Sunday morning treat.
Great tip on freezing your butter, works like a charm everytime for me.
Have a nice day Malinda!
Yes, they are the best!! Let me know how you like them and thank you!! 🙂
These are really beautiful. And perfect! I might surprise my husband with biscuits soon. I kind of quit baking when my kids left home. But I refuse to buy “those” biscuits!
Thank you so much!! Let me know how you like them!! 🙂