Devil’s Food Cake
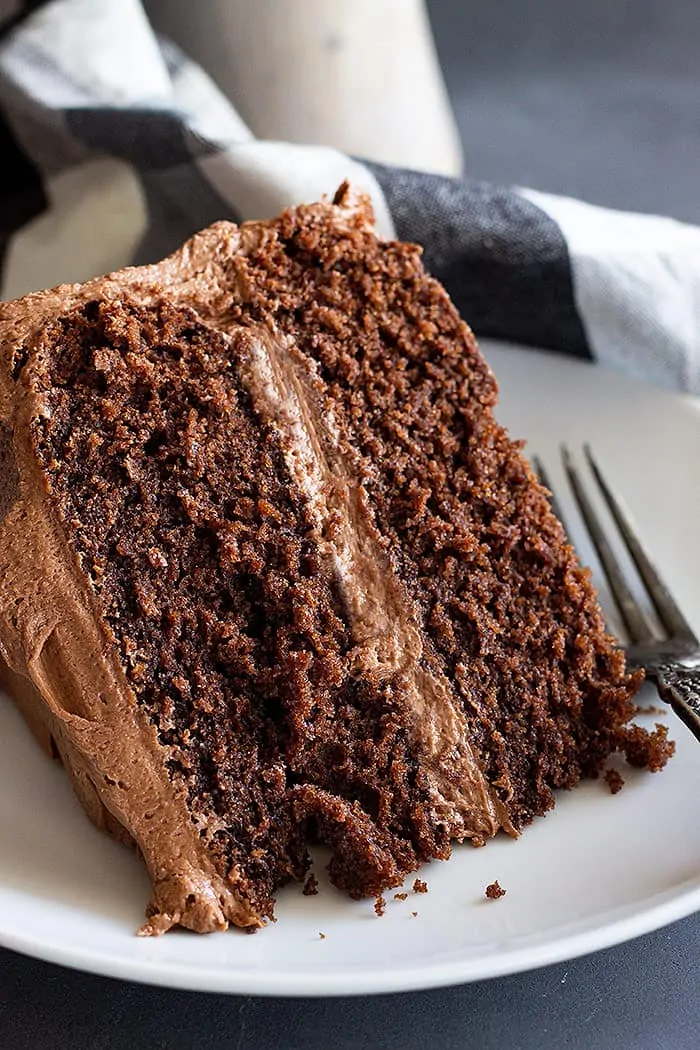
Devil’s Food Cake is a rich chocolate cake that is light and fluffy with a moist crumb. Made with cocoa powder and buttermilk for the perfect balance of flavor and tang, my Devil’s Food cake recipe has NO coffee!
Devil’s Food Cake
I have been working on this Devil’s Food cake recipe for quite a while now. At first, I wanted to make a chocolate cake that could replace a box mix and was versatile enough to make a 2-layer cake, a 9×13 sheet cake, or 24 cupcakes.
But after SEVERAL failed attempts, I threw in the towel and admitted defeat, lol.
I decided it was best to make a recipe for each of them instead of an “all-in-one.” So this is my version of a 2-layer Devil’s Food Cake.
Why You’ll Love This Devils Food Cake:
- Easy to make in 1 hour
- Light and fluffy with a tender crumb
- Perfectly moist — thanks to buttermilk
- Tastes better than the boxed kind
- And doesn’t use any coffee!
Key Ingredients to Make This Devil’s Food Cake Recipe
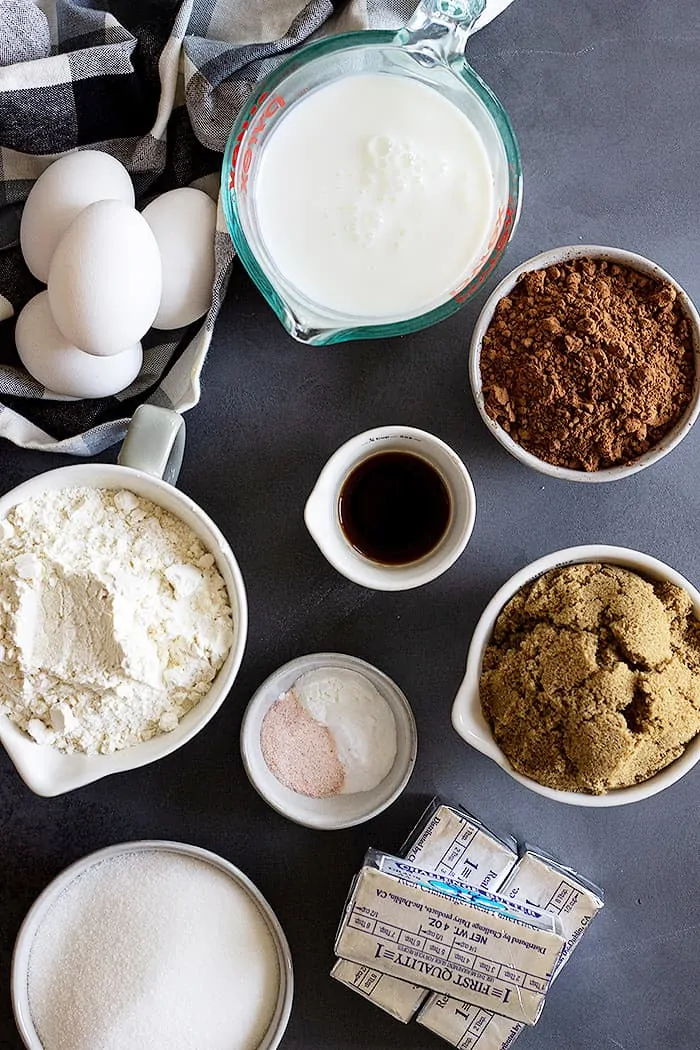
- BUTTER – Make sure your butter is at ROOM temperature. This will affect the outcome of your cake if it isn’t!
- SUGAR – I am using both white and brown sugar. Many recipes had different ratios and some didn’t use brown sugar at all. Since I am not using coffee, I knew I needed brown sugar — baking soda needs something acidic to activate it.
- EGGS – 4 large ROOM-temperature eggs are needed for this recipe. Yes, the temperature of your ingredients matters!
- COCOA POWDER – This Devil’s Food cake recipe uses natural unsweetened cocoa powder, not Dutch-processed. The two are not easily interchangeable, and unless you are very experienced with baking, I don’t suggest switching the two in recipes.
- ALL PURPOSE FLOUR – Cake flour is not suitable for Devils food (or chocolate cakes in general) because it is too fine. And when combined with cocoa powder, which is also very fine, your cake will not have the proper structure. Instead, it will be flimsy and will not hold up to any buttercream.
- BAKING SODA & BAKING POWDER – Both are needed in this recipe to give the cake lift.
- SALT – A very important ingredient!! It provides flavor — yes, even in baking!
- BUTTERMILK – Instead of hot coffee or water used in classic Devils food recipe, I used buttermilk. I am not a fan of coffee and yes, I can taste it in desserts! Buttermilk also helps keep the cake moist because cocoa powder is a very drying ingredient.
Instructions to Make Devils Food Layer Cake:
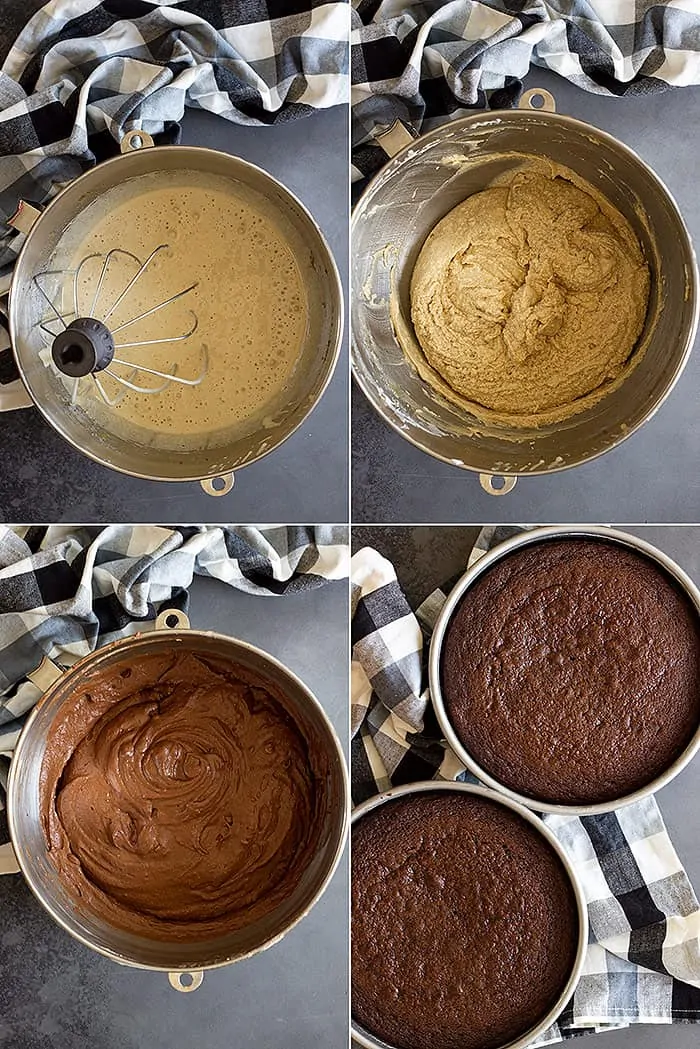
COMBINE DRY INGREDIENTS: Whisk together the flour, cocoa powder, baking soda, baking powder, and salt in a medium bowl and set aside.
RIBBONING: This is an old-fashioned method often used instead of the more modern version of creaming. You’ll need to whip the eggs with the sugar until they double in size. This aerates the cake, giving it tenderness, and also helps prevent a dense cake.
MAKE THE BATTER: Alternate adding the flour mixture and buttermilk to the whipped egg and sugar mixture on medium speed. Start with the dry ingredients, adding the flour in 3 additions and the buttermilk in 2 additions. Be sure to scrape the bowl after each addition to ensure everything is mixed in well.
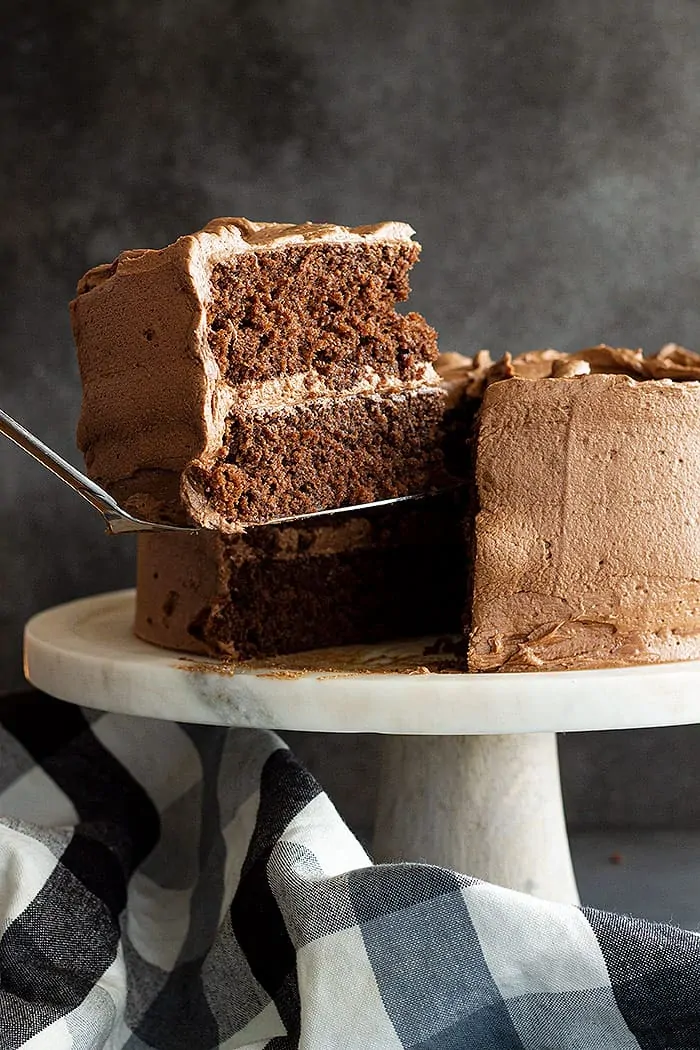
BAKE: Divide the batter evenly between 2 prepared 9″ cake pans. Bake for 30 minutes or until a toothpick inserted in the center comes out with a FEW crumbs attached. Try not to overbake your Devils Food cake or it will dry out. Cool in the pans for 10 minutes, then turn out onto a cooling rack to finish cooling. Cool completely before frosting.
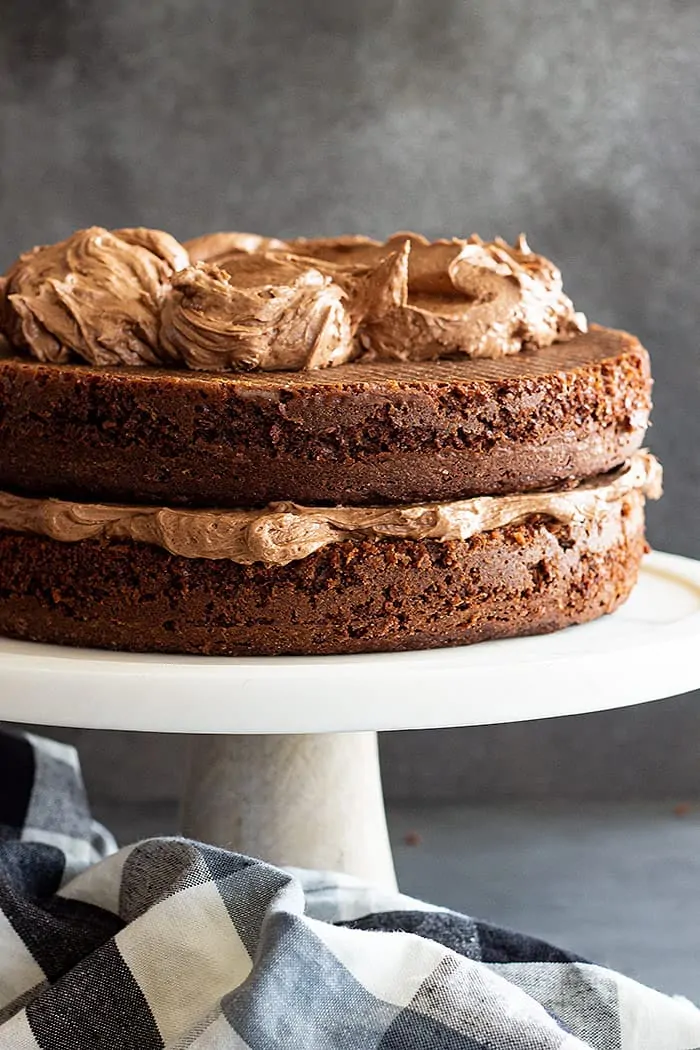
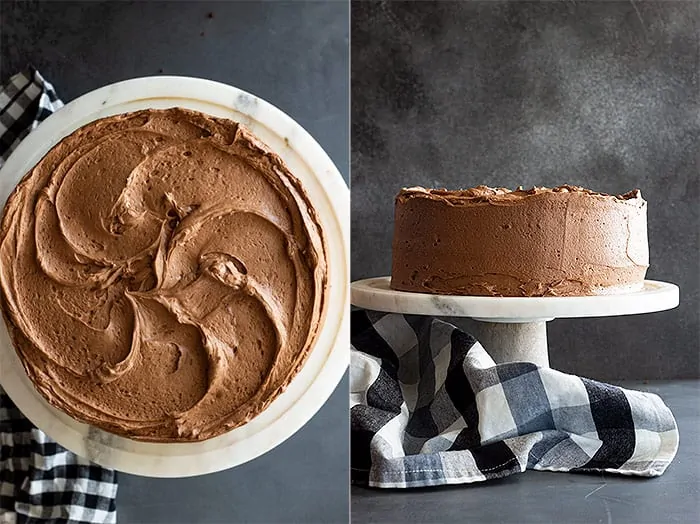
FROSTING: Beat the butter on high speed until pale in color. Add remaining ingredients and beat on low until combined, then on high until light and fluffy.
FAQ
What is Devil’s Food cake?
Devils Food is a moist sponge cake that has an intensely rich chocolate flavor thanks to Dutch-processed cocoa powder. It’s often stacked with buttercream and served as a layer cake.
Is Devils Food cake like angel food cake?
The two couldn’t be more different! Angel’s Food is a fluffy sponge cake that gets its texture from whipped egg whites. There’s no butter used to make it, and it has hints of vanilla and almond flavors. It’s rarely eaten alone and is often served with fresh fruit and whipped cream.
Alternatively, Devils Food cake is made with both butter and whole eggs, has a rich chocolate flavor, and a denser, moist crumb — essentially, the complete opposite of Angel’s Food!
What is the difference between German Chocolate and Devil’s Food cake?
As mentioned above, Devil’s Food cake has a rich chocolate flavor, while a German Chocolate sponge is typically lighter and more delicate. The latter is also served with a signature pecan-coconut frosting.
Tips for Making Devils Food Cake
- Always use room-temperature ingredients. Unless noted otherwise in a recipe, this applies to baked goods of all sorts! When everything is at the same temperature, the ingredients blend together more easily for the best batter consistency.
- Take your time whipping the eggs and sugar. It’s VERY important that they double in size if you want the best texture in your cake. A stand mixer will keep your arms from getting too tired.
- Don’t have buttermilk? You can make an easy homemade substitute in minutes! For this recipe, add just over a tablespoon of lemon juice or vinegar to a measuring cup, then add regular milk to the 1 1/4 cup line. Let it sit for about 5 minutes, until curdled, then use in place of the buttermilk!
- Add a simple frosting. After researching, I found that Devil’s Food cake was most often paired with a 7-minute frosting (which happens to be my favorite) or sometimes a meringue buttercream. Whichever you choose, opt for more chocolate!
More Indulgent Chocolate Desserts
Thanks so much for reading! Let me know what you think about this devils food cake recipe!
HUNGRY FOR MORE? Subscribe to my newsletter and follow along on Pinterest, Facebook, and Instagram for all my latest updates!
Devil’s Food Cake
Ingredients
CAKE:
- 1½ cup (170g) butter, room temperature
- 1 cup (200g) sugar
- 1 cup (200g) packed brown sugar
- 4 large eggs, room temperature
- 1½ tablespoon vanilla
- 2 cups (250g) all purpose flour (spooned and leveled)
- ¾ cup (65g) natural unsweetened cocoa powder (spooned and leveled)
- 2 teaspoon baking soda
- 1 teaspoon baking powder
- 1 teaspoon salt
- 1¼ cups (300ml) buttermilk
FROSTING:
- 1 cup butter, softened
- 3½ cups (375g) confectioners’ sugar
- ⅔ cup (50g) cocoa powder, natural or dutch processed
- 5 tablespoons heavy cream
- 2 teaspoons vanilla
- ¼ teaspoon salt
Instructions
CAKE:
- Preheat oven to 350°F. Line two 9" cake pans with parchment paper, grease the sides, and set aside.
- Whisk the flour, cocoa powder, baking soda, baking powder, salt together in a large bowl; set aside. Using a handheld or stand mixer fitted with a whisk attachment beat the eggs on medium just until combined. Add the sugars and beat on high until light and fluffy and doubled in size.
- Fit mixer with the paddle attachment and add butter a little at a time (about 1 tablespoon at a time), and mix for 10 seconds after each addition scraping the bowl as needed. The batter may appear curdled and that is OK. Add the vanilla.
- Add flour mixture in 3 additions, alternating with 2 additions of buttermilk mixing just until incorporated after each addition. Scrape down the bowl as needed. After the additions mix on medium speed just until thoroughly combined.
- Divide batter evenly between prepared pans. Bake for 30 minutes or until a toothpick inserted in the center comes out with a few crumbs. Let the cakes cool in the pans for 10 minutes before removing from the pans to cool completely on wire racks.
FROSTING:
- In a stand mixer fitted with a paddle attachment beat the butter until pale in color. Add remaining ingredients and mix on low until combined then beat on high until light and fluffy (about 3 minutes). If the frosting seems too thin add a little confectioners' sugar. If it is too thick add a little more cream.
ASSEMBLY:
- Place 1 cake layer on a serving platter or cake stand. Spread an even layer over the top. Place second cake layer on top and frost the top and sides with remaining frosting. If desired make pretty swirls in the the frosting.
- Store cake in the refrigerator for 3-5 days.
Notes
- MAKE AHEAD: Completely cooled cakes can be wrapped tightly in plastic wrap and kept at room temperature for up to 1 day or refrigerated for up to 2 days. Frosting can be stored in the refrigerator for up to 1 week. Allow everything to come to room temperature before frosting. May need to beat the frosting again before frosting the cake.
- FREEZER FRIENDLY: Completely cooled cakes can be wrapped tightly in plastic wrap then in foil and frozen for up to 3 months. Frosted cake can be wrapped in the same manner and frozen for up to 3 months as well.
- Buttermilk: I don’t recommend making a DIY version of buttermilk for this cake. I haven’t tested it so I can’t say how it will turn out.
- High Altitude: Use 1 teaspoon baking soda and ¾ teaspoon baking powder


So delicious! The whole family enjoyed this!
Thank you!! So glad you liked it!
So rich! The whole family loved it. Definitely making again.
So glad everyone liked it!
My kids raved over this one! So fluffy and rich – it was amazing! Thank you!
Thank you! So glad you liked it!
This was SO sweet and indulgent! We LOVED it! Thank you so much!
So glad you liked it!