Homemade Graham Cracker Pie Crust Recipe
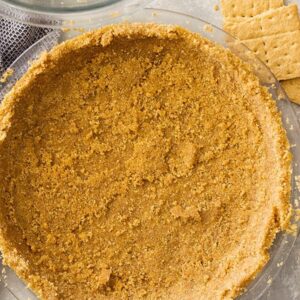
This thick and buttery Graham Cracker Pie Crust Recipe is easy to make from scratch and tastes better than store-bought! You only need 4 ingredients to create the perfect crust for cheesecakes, pies, and other desserts.

Graham Cracker Pie Crust Recipe
If there’s one thing every at-home baker needs, is an easy graham cracker crust recipe. It’s perfect for pies, cheesecakes, lemon bars… you name it! You won’t regret having this one in your back pocket.
Now, I do want to take the time to say that there is no shame in buying a premade crust — I use them from time to time too! But, trust me when I say you will be pleasantly surprised at how much more delicious a homemade graham cracker crust is! It boasts more flavor and never tastes stale.
In fact, this crust is thick, buttery, and SO good! It isn’t overly sweet and perfectly complements lots of different desserts. Plus, it’s so easy to make. I feel comfortable calling this a fool-proof recipe.
Once you’re done, you’ll be left with a homemade graham cracker pie crust you can use in a variety of recipes. Bake it before adding a filling (tips on how long to bake graham cracker crust included below too!), make it ahead and pop in the fridge or freezer until you need it, or use it in your favorite no-bake desserts. The possibilities are endless!
Why You’ll Love Homemade Graham Cracker Crust
- Made with just 4 ingredients
- Versatile — use it in so many ways!
- Incredibly easy
- Ready to use in 15 minutes
- So much better thank storebought

Key Ingredients to Make Homemade Graham Cracker Pie Crust
- GRAHAM CRACKERS – I went with classic graham crackers for my graham cracker pie crust recipe, but you can use any flavor you’d like.
- BUTTER – Make sure to melt it before you get started!
- GRANULATED SUGAR – I kept things simple and used regular white granulated sugar, but you can also use brown sugar instead for a little extra flavor.
- CINNAMON – Adds a little extra something — it’s not overpowering but gives the crust a really special flavor.
Instructions to Make My Easy Graham Cracker Crust Recipe
PREPARE THE GRAHAM CRACKERS: Add the graham crackers to a food processor or blender and pulse until ultra-fine crumbs form.

COMBINE WITH THE SUGAR: Add the crumbs, sugar, and cinnamon to a medium-sized bowl and mix to combine.

STIR IN THE BUTTER: Next, stir in the melted butter until well combined. The mixture should be thick, coarse, and sandy.


PRESS CRUST INTO PAN: Transfer your homemade graham cracker crust to a 9-inch pie pan and press it firmly into the bottom. It needs to be compact for the crust to hold its shape — this is very important! Use the bottom of a flat measuring cup or a glass cup to push the crumbs down tightly. I use my fingers for the sides, then press again with my measuring cup to get it really smooth and compact.
Ways to Use My Graham Cracker Pie Crust Recipe
- No bake: Chill the crust in the fridge for 1-2 hours. This helps the butter become solid again so it holds everything together. You can also fill it (as long as the filling is cold) and then refrigerate it, but it will need a longer chilling time. If you choose to fill then refrigerate, make sure the crust is super compact first.
- Bake: Bake the crust according to the directions for the dessert you are making. I usually bake mine at 350 degrees for 8 minutes. But some recipes say 325 or 300 degrees F for 10 minutes. It entirely depends on the recipe you are making.
- Make ahead: You can also store the crust in the refrigerator covered with cling wrap for up to 3 days before filling it, or you can freeze it for up to 3 months. Be sure to freeze it in the pan and wrap it very well first in cling wrap then foil to protect it from getting any freezer burn. I recommend doing this even if you only plan to freeze it for a short time because the crust can soak up flavors quickly. Remove it from the freezer and let it thaw before filling.

FAQ
You can use this crust for limitless options! Chocolate pie, key lime pie, lemon bars, classic cheesecake, no-bake cheesecake… the list truly is endless. This No Bake Vanilla Cheesecake is a great option to try, or these S’mores Cookie Bars would also be tasty.
If your crust is super crumbly, you probably didn’t add enough butter. This key ingredient holds the others together as it solidifies. The sugar also plays a role in holding the crumbs together, so make sure to use the amount of butter and sugar called for.
On the other hand, if you use too much butter, your pie crust will come out hard. Again, follow the amounts indicated on the recipe card below and you shouldn’t run into this issue!
I used regular graham crackers! You could use cinnamon sugar crackers, honey crackers, or even chocolate ones instead. You can even buy graham crackers already ground into crumbs these days!
If you do plan on baking your crust before using it, I recommend about 8 minutes at 350 degrees F. That said, some recipes will call for different temperatures and baking times, so be sure to refer to the instructions for the specific dessert you’re making.
Homemade Graham Cracker Crust Pro Tips
- Don’t skimp on the butter. It really holds the crust together, so using too little will result in a crumbly crust that doesn’t hold together when filled.
- Feel free to adjust. The butter is the only ingredient you shouldn’t mess with — you can definitely play around with how much sugar or spices you add! For a sweeter crust, you can use more sugar. If you want a stronger cinnamon flavor, increase that as well. You can also easily add different or additional spices. A pumpkin pie spice blend would pair great with a pumpkin cheesecake, for example!
- Make sure to press the crust in very firmly. You can start with your hands, but using a flat measuring cup (as pictured) or a glass cup really helps compact it down nicely.
- Don’t worry about it looking perfect. Half the beauty of making a graham cracker pie crust recipe from scratch is the slightly rustic, homemade look.
- If you don’t have a food processor, you can place the crackers in a Ziploc bag and crush them with a rolling pin. Just make sure the crumbs are super fine so the crust holds together.
- My graham cracker crust recipe yields about 1.5 cups of crumbs, which is a bit more than most standard crusts. I like mine a bit thicker than average as it ensures they’re super sturdy and don’t fall apart. And of course, it tastes great too.

More Dessert Recipes To Try
- No Bake Vanilla Cheesecake
- Lemon Mousse Dessert Cups
- One Bowl Cocoa Brownies
- Fresh Strawberry Pie
- Devil’s Food Cake
- Chewy Rice Krispie Treats
Thanks so much for reading! Let me know what you think about my graham cracker pie crust recipe!
HUNGRY FOR MORE? Subscribe to my newsletter and follow along on Pinterest, Facebook, and Instagram for all my latest updates!
Homemade Graham Cracker Pie Crust Recipe
Ingredients
- 1½ cups graham cracker crumbs about 10 full sheets
- ¼ cup sugar
- ¼ teaspoon cinnamon
- 6 tablespoons butter melted
Instructions
- Using a food processor or blender grind the crackers until you have fine crumbs. Otherwise place crackers in a ziploc bag and crush with a rolling pin until you have fine crumbs. It is important to have fine crumbs so the crust holds together well.
- In a medium sized bowl combine the crumbs, sugar and cinnamon. Stir in the butter until well combined. The mixture should be thick, coarse and sandy.
- Press the mixture into any 9 inch pan. Use a flat measuring cup or the bottom of a glass to help compact the crust. This is very important or the crust may fall apart.
- No bake: Chill in the refrigerator for at least 1 hour before filling.
- Baked: Bake for 8 minutes at 350 degrees F or according to the recipes directions.
- Make ahead: Store the crust wrapped in cling wrap in the refrigerator for up to three days before filling, or freeze for up to three months. Freeze in pan wrapped in both cling wrap and foil. Thaw completely before using.
Notes
- This recipe also works great with any flavor of graham crackers.
- You can use brown sugar in place of regular sugar for some extra flavor.
- Don’t skimp on the butter. It really holds the crust together, so using too little will result in a crumbly crust that doesn’t hold together when filled.
- Make sure to press the crust in very firmly. You can start with your hands, but using a flat measuring cup (as pictured) or a glass cup really helps compact the crust.
- Don’t worry about it looking perfect. The beauty of a graham cracker crust is the slightly rustic, homemade look.


Sounds fantastic! Can I use margarine instead of butter for dairy free?
Hi Sue! I don’t recommend using margarine in place of butter. Thanks for asking!
Such an easy crust and tastes 10x better than the premade ones! I used mine for a chocolate pie, but it would be great for anything!
Thank you very much! And I have to agree!!
I also happen to like my graham crust a bit thicker.
I think the crust is sometimes the best part of the pie.
Adding some cinnamon to your graham crumbs is a wonderful idea.
Whenever I do that, my pies are gone much faster….LOL!
Plus, homemade is ALWAYS better!
Have a nice day Malinda! 🌻
Thank you Dalila!! 🙂
I agree, the made from scratch version is so much better tasting than the store bought one. Once you have made one you will never buy a ready made one again.
I agree!! Thanks Grandma!