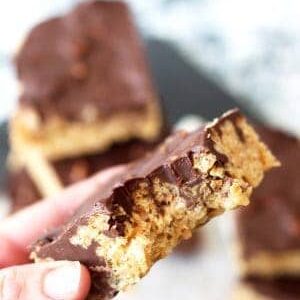
Chocolate Peanut Butter Rice Krispie Treats
These Chocolate Peanut Butter Rice Krispie Treats are going to be your new favorite twist on a classic treat! Peanut butter flavored Rice Krispies are studded with mini peanut butter cups and topped with a peanut butter chocolate topping… what’s not to love?!

Chocolate Peanut Butter Rice Krispie Treats
Rice Krispie treats are a classic dessert or snack choice, so you may be wondering why I’d want to reinvent them. All I have to say are three words: Peanut. Butter. Cup.
This particular recipe marries the fluffy and gooey marshmallow goodness of the classic Rice Krispies, with the life-changing addition of Reese’s Peanut Butter Cups!
These chocolate peanut butter rice krispie treats are soft and chewy, rich in peanut butter flavor, studded with mini peanut butter cups, and topped with a mixture of smooth and creamy peanut butter and chocolate. Just imagine that gentle crunch and sweet chocolate coating melting in your mouth!
Consider yourself warned — you may become addicted! After you make this peanut butter chocolate rice krispie treat recipe for the first time, please take the time to let me know how you and your family enjoyed them (and don’t blame me if your kids beg you to make these weekly).
Why You’ll Love Peanut Butter Chocolate Rice Krispie Treats
- Full of decadent chocolate and PB flavor
- A tasty twist on a classic
- Super easy to make
- Ready in less than 20 minutes
- Perfect for bake sales, parties, or at-home snacking!

Key Ingredients to Make Rice Krispies Treats with Chocolate and Peanut Butter
- MINIATURE MARSHMALLOWS – The main piece of the puzzle when making Rice Krispie treats is the marshmallows. That sweet little morsel has the power to make your treats chewy and gooey, or hard and tough! Obviously, we want chewy and gooey deliciousness, so always use fresh mallows.
- RICE KRISPIES – The base of your treats! I like the name brand, but you can use a generic brand too if you’d like.
- BUTTER – Also for the rice krispie base. You’ll melt the butter and marshmallows together to form that sticky coating that holds all the krispies together.
- PEANUT BUTTER – You’ll include this along with the butter and marshmallows! These are chocolate peanut butter rice krispie treats after all… and trust me, these babies are loaded with PB! You’ll also use it to make a peanut butter chocolate topping.
- VANILLA – Just a touch for added warmth and sweet flavor in the krispie base.
- MINI PEANUT BUTTER CUPS – The reason why I love these so much!! I add mini Reese’s cups directly in with the marshmallow mixture and the rice cereal. SO good.
- SEMI-SWEET CHOCOLATE CHIPS – You’ll melt these down along with the PB to make the topping for your rice krispies treats with chocolate and peanut butter.
Instructions to Make Chocolate Peanut Butter Rice Krispy Treats
PREP YOUR BAKING PAN: Use foil to line a 9×9 baking pan if you want super thick treats or a 9×13 pan for more normally sized treats. Allow extra foil for handles so it’s easier to remove the treats from the pan. Grease the bottom and sides with 1 tablespoon of butter and set aside.
MAKE THE RICE KRISPIE BASE: In a large pot, melt butter over medium to low heat. Stir in the marshmallows and continue stirring until almost all the marshmallows are melted. Remove the mixture from heat and stir in the peanut butter and vanilla. Fold in the cereal and then the peanut butter cups.
SPOON INTO THE PAN: Spoon the chocolate peanut butter rice krispy treats mixture into your prepared pan, but be sure not to press it too hard. If it’s packed too compactly, it will be too hard to chew.
MAKE THE PEANUT BUTTER CHOCOLATE TOPPING: In a medium microwave-safe bowl, melt the chocolate chips and peanut butter together. Microwave in 15-30 second intervals, stirring after each until the mixture is fully melted.
ASSEMBLE THE PEANUT BUTTER CHOCOLATE RICE KRISPIE TREATS: Pour the topping over the cereal and spread it into an even layer. Allow everything to cool completely before cutting it into bars. Enjoy!

FAQ
You can store your treats covered at room temperature for a few days before they start to harden, or you can keep them in the refrigerator for a few days longer. If you want to go crazy and freeze them, just be sure you use an airtight container and freeze them once they’re cut. If not, you’ll have a heck of a time slicing them up!
Of course! If you’re into different flavor combos, go ahead and give them a try. One I’ll probably try next is salted caramel. Imagine drizzling warm caramel over some chewy Rice Krispie treats! YUM!
You’ll end up with super hard chocolate peanut butter rice krispie treats if you melt the marshmallows too quickly or over melt them! Take your time when melting the mallows and butter together. You should also make sure to melt them down until just combined to prevent overly hard results.
If your marshmallow to rice cereal ratio is off — specifically if you add too much marshmallow — your treats will inevitably fall apart. Follow the recipe instructions below closely and you shouldn’t have this problem!
Tips for Making My Peanut Butter Chocolate Rice Krispie Treat Recipe
- Remember to always use fresh marshmallows. You’ll want the mini marshmallows to be as soft as possible because if they’re hard or stale, they’ll make your treats tough to chew.
- Do not over-melt your marshmallows and butter together or the mixture will harden! Heat them until they’re just combined and then remove from the stovetop.
- Let the marshmallow, butter, and PB mixture cool ever so slightly before adding the rice cereal. This way, your chocolate peanut butter rice krispy treats won’t run the risk of coming out soggy!
- When pressing the mixture into your baking pan, use a light touch. Over-pressing will compact the treats and make them harder to chew.
- Switch up the chocolate for a richer flavor. I usually reach for semi-sweet chips for peanut butter chocolate rice krispie treats, but you could also use dark chocolate or a mix of dark and semi-sweet!
More Chocolate and Peanut Butter Recipes To Try
- Homemade Chewy Brownies
- S’more Cookie Bars
- No Bake Chocolate Peanut Butter Bars
- Chocolate Peanut Butter Poke Cake
- Dark Chocolate Peanut Butter No Bake Cheesecake
Thanks so much for reading! Let me know what you think about these rice krispies treats with chocolate and peanut butter!
HUNGRY FOR MORE? Subscribe to my newsletter and follow along on Pinterest, Facebook, and Instagram for all my latest updates!
Chocolate Peanut Butter Rice Krispie Treats
Ingredients
Rice Krispie Treat Base
- 6 tablespoons butter divided
- 10 cups miniature marshmallows
- 6 cups rice krispies
- 2/3 cup creamy peanut butter
- 1 teaspoon vanilla
- 1 8 oz package mini peanut butter cups
Peanut Butter Chocolate Topping
- 1 1/2 cups semi sweet chocolate chips
- 3/4 cup creamy peanut butter
Instructions
RICE KRISPIE TREAT BASE
- Line a 9×9 (super thick treats) or 9×13 (thinner more normal sized treats) baking pan with foil allowing extra for handles. This way it is easier to remove the treats from the pan. Grease the bottom and sides of the pan with 1 tablespoon butter. Set aside.
- In a large pot melt the butter over medium low to low heat. Stir in marshmallows and continue stirring until almost all the marshmallows are melted. Remove from heat and stir in the peanut butter and vanilla. Stir in the cereal then the peanut butter cups.
- Spoon into prepared pan and gently press into pan. Don’t press down to hard or they will be too compact and hard to chew.
PEANUT BUTTER CHOCOLATE TOPPING
- In a medium microwave safe bowl melt the chocolate chips and peanut butter together. Microwave in 15-30 second intervals stirring after each until fully melted. Pour over cereal and spread into an even layer. Cool completely before cutting into bars.


I’m the self-proclaimed queen of peanut butter and chocolate and I give this recipe an A+!
Wow!! Thank you very much!
I have made these twice now and they were a hit both times. What is better than something with Reeses Peanut Butter Cups.
I’m really glad to hear that!! Thanks, grandma!
The cake is beautiful!
Thank you Grandma!!
I think this might be the perfect treat for my kids. They love rice krispie treats and reeses, so this should do the trick. I love that I don’t have to turn on the oven to make a great treat.
I agree!! Turning on the oven in the summer is no fun! Thanks Patti and I hope you enjoy!