Rustic Berry Galette
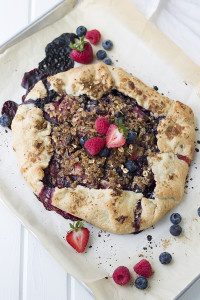
This Rustic Berry Galette is super easy to make and is even more delicious to enjoy! The crumbly crust and spiced oat topping are delicious complements to the sweet and juicy berry filling. This recipe is so much easier to make than a pie, so once you lean into the rustic form of the galette you’ll never look back!

Why You’ll Love This Berry Galette
I haven’t perfected the art of making a beautiful pie and it really frustrated me until I learned to lean into the imperfection. A galette is essentially the same thing as a pie, it’s just unstructured and the crust doesn’t cover the entire top. It may look a little less tidy, but this Berry Galette will make you a convert, you just wait!
This recipe is way faster to make than your standard pie, and guess what – it tastes nearly the same! You still get to enjoy the buttery crust and juicy pie filling, it’s just a little more rustic-looking. Enjoy it with a little whipped cream or ice cream on top for an extra treat!
Ingredients
I’ve broken down the ingredient list into three separate categories so you can keep everything straight as you start to bake! Let’s dive into the crust, berry filling, and oat topping individually.
Galette Crust
- All-purpose flour
- Salt
- Butter – cold
- Water – cold
Berry Filling
- Brown sugar – packed
- All-purpose flour
- Lemon zest
- Mixed fresh berries – I used 1 cup raspberries, 2 cups blueberries, and 2 cups sliced strawberries, but you can use your favorites
Galette Topping
- Old-fashioned oats
- Brown sugar – packed
- Cinnamon
- Butter – cold

How to Make This Berry Tart Recipe
Step 1: Preheat
Preheat your oven to 425 degrees F.
Step 2: Make the Crust
- Combine the flour and salt in a medium-sized bowl.
- Cut in the butter until you have coarse crumbs. Don’t cut it it in too fine.
- Add 4 tablespoons of water and mix. If it seems too dry, add in one more tablespoon. Mix with a fork until large clumps start to form.
- With your hands, form the dough into a disk and wrap it tightly in plastic wrap. Place it in the freezer.

Step 3: Make the Berry Filling
Combine the flour, brown sugar, and zest in a large bowl. Add in the berries and gently toss to coat them, then set the filling aside.
Step 4: Make the Topping
In a small bowl, combine the topping ingredients and cut in the butter until you have fine crumbs. Set it aside for later.
Step 5: Assemble the Berry Galette
- Remove your pastry dough from the freezer and unwrap it. Place it on a well-floured work surface and roll it out into a 15-inch circle. Lightly dust the dough with flour and fold it in half, then half again. Place it onto a well-greased (or parchment-lined) baking sheet.
- Unfold the dough and spoon the berry filling into the middle of the circle. Fold the edges of the dough up onto the filling and then sprinkle it with your reserved topping.
Step 6: Bake
Bake your galette for 30-35 minutes, or until the crust is golden brown and the filling is bubbling a little. Let it cool for 10-15 minutes before serving. Enjoy!

FAQs
You can! If you’re using frozen berries, just be sure to thaw them and drain them of any excess liquid before you add them to the recipe.
Pies are made in a shaped pan and they’re completely encased by their crust. Galettes are baked freeform on a sheet and the crust only covers the edges of the filling.
A galette is actually a type of tart, so you could call this a berry galette or a berry tart interchangeably.
You can store your leftovers at room temperature, covered, for up to 2 days, or in the refrigerator in an airtight container for up to 4 days.

More Berry Recipes To Try
- Triple Berry Pretzel Salad
- Frozen Triple Berry Cheesecake
- Triple Berry Coconut Parfait
- Healthier Berry Cheesecake Parfait
- Berry Icebox Cake
DID YOU KNOW….
rating and sharing recipes is one of the best ways you can support your favorite food bloggers? If you make this recipe, I would love if you clicked the stars when commenting below to leave a rating and/or sharing a photo on Instagram, Facebook, or Pinterest!
Rustic Berry Galette
Ingredients
- Crust
- 1 ½ cups all purpose flour
- ¾ teaspoon salt
- ½ cup + 2 tablespoons butter cold
- 4-5 tablespoons cold water
- Filling
- ⅔ cups packed brown sugar
- ½ cup all purpose flour
- 1 teaspoon lemon zest
- 5 cups mixed fresh berries
- Topping
- ¼ cup old fashioned oats
- ¼ cup packed brown sugar
- ¼ teaspoon cinnamon
- 2 tablespoons butter cold
Instructions
- Preheat oven to 425 degrees F.
- To make the crust combine the flour and salt in a medium sized bowl. Cut in the butter until you have coarse crumbs. Don't cut in too fine. Add in 4 tablespoons of water and mix (if it seems too dry add in the last tablespoon of water) Mix with a fork until large clumps start to form. Then with your hands form into a disk. Wrap tightly in plastic wrap and place in the freezer.
- For the filling combine the flour, brown sugar and zest in a large bowl. Add in your berries and gently toss to coat. Set aside.
- For the topping in a small bowl combine the ingredients and cut in the butter until you have fine crumbs. Set aside.
- Remove your pastry from the freezer and unwrap. Place on a well floured work surface and roll the dough out to a 15 inch circle. Lightly dust the top of the dough with flour and fold dough in half then half again and place the dough onto a well greased baking sheet or line it with parchment paper. Unfold your dough and spoon the berry filling onto the middle of the dough circle and fold the remaining dough up onto the filling. Sprinkle with reserved topping.
- Bake for 30-35 minutes or until the crust is golden brown. Let cool 10-15 minutes before serving.
Notes
- If using frozen berries, thaw and drain.
- Store your leftovers at room temperature, covered, for up to 2 days, or in the refrigerator in an airtight container for up to 4 days.
Nutrition





Pie Schmie. Seriously, who needs it when you could be having this? I love the oats on there! Lovely photos Malinda!
Thank you so much Karen!! Thanks for stopping by!!
I hate it when that happens, but such a creative idea to make it into hearts! Thanks, Angela!
That looks amazing! And I have the same problem you have with pie crust. The last time I tried to make a pie, the entire top crust crumbled while I was trying to move it from the counter to the top of the pie. I ended up cutting the pieces of crust into little heart shapes and pretending I had planned to do it that way on purpose!