Mac and Cheese Cups
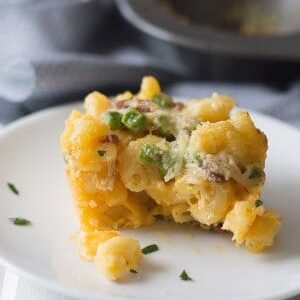
Simple and easy to make, these baked Mac and Cheese Cups make a perfect appetizer, side dish, or lunchbox entree. Full of classic mac and cheese flavors, they’re cheesy, creamy, salty-sweet bite-sized noshes and absolutely delicious!

Mac and Cheese Cups
These little bites of pure comfort food are always a hit! No matter when I serve my mac and cheese cups, people always rave about them and are the first thing to disappear. There’s just something fun about finger food appetizers like Zucchini Pizza Bites, Individual 7-Layer Cups, and Beef Enchilada Cups, and these baked macaroni and cheese cups are no different.
Seriously, when food is portable, it just tastes better!
These baked cups are made from scratch with simple pantry staples! Tender elbow macaroni is smothered in an easy rich and creamy homemade cheddar cheese sauce full of crispy bacon and sweet peas and topped with freshly grated Parmesan. They’re then baked in a muffin tin to golden-brown perfection. The result is an irresistible handheld, portable mac and cheese cup that is perfectly crisp on the outside, and deliciously moist on the inside.
So, whether you’re making for your kid’s lunches or looking to display at your next holiday get-together, these mini cups will satisfy all your comfort food cravings in a single bite.
Why You’ll Love Macaroni and Cheese Cups
- Uses simple pantry staples
- Requires only 15 minutes of hands-on prep!
- Easy to make and portable
- Perfect to serve as an appetizer, in lunch boxes, or as a tasty snack
- Oh, and those crispy, cheesy edges are the best!

Key Ingredients to Make Mac n Cheese Cups
- PASTA – Any shaped pasta will work for this recipe, but I like to use the classic elbow macaroni noodles.
- MILK – You can use regular milk or lactose-free milk. To keep your mac n cheese cups lower in calories, feel free to use fat-free (skim) milk instead.
- EGG – I like to add one egg to help bind everything together — it also helps them keep their cup shapes when you take them out of the muffin tin!
- PARMESAN – Parmesan Cheese is a hard Italian cheese that has a rich nutty flavor. For the freshest, most flavorful cheese, purchase a pre-cut wedge and grate it yourself using a box grater. If the flavor of Parmesan is too strong, feel free to use Pecorino Romano.
- SHARP CHEDDAR CHEESE – Sharp cheddar cheese has a strong, salty taste that pairs wonderfully with the nutty Parmesan. To ensure that the cheese will properly melt, I recommend buying a block of cheddar and shredding yourself using a box grater.
- PEAS – Frozen peas are flash steamed before being packed so they keep their fresh natural sweet flavors and bright green color. If you’d prefer to use canned peas, feel free — just be sure to drain well before adding it to your mac and cheese cups.
- BACON – For extra protein and yummy flavor.

Instructions to Make Mac & Cheese Cups
This mac and cheese cup recipe requires only 15 minutes of hands-on prep, then you let the oven do the rest!
PREHEAT OVEN AND PREP: Preheat the oven to 375 degrees F and spray a 12-cup muffin tin with looking spray. Set aside.
COOK PASTA: In a large pot, boil water. Add pasta and cook for 7 minutes. Do not overcook. Drain well.
PREPARE CHEESE SAUCE: While the pasta is cooking, whisk together the milk and egg in a large bowl.
ASSEMBLE MAC & CHEESE CUPS: Once the pasta is cooked and drained, add it to the bowl with the milk and egg mixture. Stir in cheddar cheese, bacon, and peas. Mix until cheese is melted. Spoon mac and cheese into the prepared muffin tin and top each with freshly grated Parmesan cheese.
BAKE: Bake for 20 minutes or until lightly golden brown. Cool for 10 minutes before removing from the pan. Enjoy!
FAQs
Store any leftover mac and cheese cups in an airtight container in the fridge. They will keep for up to 5 days.
These baked mac n cheese cups are a wonderful freezer-friendly dish! Once cooled, place on a wax paper-lined baking sheet and freeze for 4-6 hours until frozen. Store them in an airtight container or bag for up to 3 months. When you’re ready to eat, make sure to let the cups thaw overnight in the fridge before reheating.
You’ll know your cups are done when the cheese is bubbling, the tops are golden-brown, and the edges are slightly crispy.
Sure can! To add an additional element of creaminess and to ensure your cups come out rich every time, use ½ cup of sour cream and ½ cup of milk, half-and-half, or heavy cream instead of the whole cup of milk that the recipe calls for.
Mac and Cheese Cup Recipe Tips and Tricks
- Freshly grate the cheddar cheese and Parmesan to ensure the freshest quality and best meltability.
- Use traditional macaroni pasta or any shape you prefer.
- For easier clean-up, line each muffin crevice with a paper liner and then fill.
- Top with a breadcrumb Parmesan mixture for an added crunch.
- If your macaroni and cheese cups do not easily come out of the pan, gently use a butter knife to loosen them.
More Hand-Held Recipes To Try
- Baked Garlic Sriracha Wings
- Chicken Taquitos
- Pepperoni Pizza Sliders
- BBQ Pulled Pork Biscuit Sliders
- Loaded Baked Potato Wedges
- Toasted Ravioli
Thanks so much for reading! Let me know what you think about these mac n cheese cups!
HUNGRY FOR MORE? Subscribe to my newsletter and follow along on Pinterest, Facebook, and Instagram for all my latest updates!
Mac and Cheese Cups
Ingredients
- 1 1/2 cups elbow macaroni
- 1 cup milk
- 1 egg beaten
- 3 cups shredded sharp cheddar cheese
- 4 strips bacon cooked and crumbled
- 1/2 cup frozen peas
- 1/4 cup grated Parmesan cheese
Instructions
- Preheat oven to 375 degrees F. Grease or spray a 12 cup muffin tin, set aside.
- Bring a large pot of water to a boil. Add in pasta and cook for 7 minutes, DON’T OVERCOOK. Drain well. While the pasta is boiling get the remaining ingredients ready. Whisk together the milk and egg. Add to the drained pasta along with the cheddar cheese, bacon and peas. Stir until cheese is melted. Spoon in prepared muffin tin and top each with Parmesan cheese. Bake for 20 minutes or until lightly browned. Let cool 10 minutes before removing from pan.


